Alright, let me preface this entire thread by saying I pretty much made this tutorial after I offered to do it for someone who was struggling with it, so hopefully this will help that person and anyone else that finds this. Here we go!
First off, you’re going to need JarSplice of course. You can obtain a copy from the following link:
http://ninjacave.com/jarsplice
The download link is just above the comment section, it’s pretty tiny actually. You will use JarSplice if you need to deploy your program to multiple operating systems which require different native files. It’s relatively easy after you get the hang of it, which is what I’m here for! I assume you are using Eclipse, so sorry if you aren’t I have no idea how to export Jar files in any other IDEs.
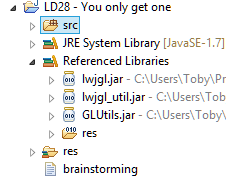
First step, figure out what libraries your project is using:
In this picture you can see I use the following libraries:
- lwjgl.jar
- lwjgl_util.jar
- GLUtils.jar
The last library is of my own creation, so don’t worry if you have no idea what it is!
Second step, Export the Jar with the libraries your program utilizes
Fortunately, this step is very easy if you are using Eclipse. Again, I have no idea how to do this in other IDEs, sorry! Follow the steps:
- Right click on the project you wish to export.
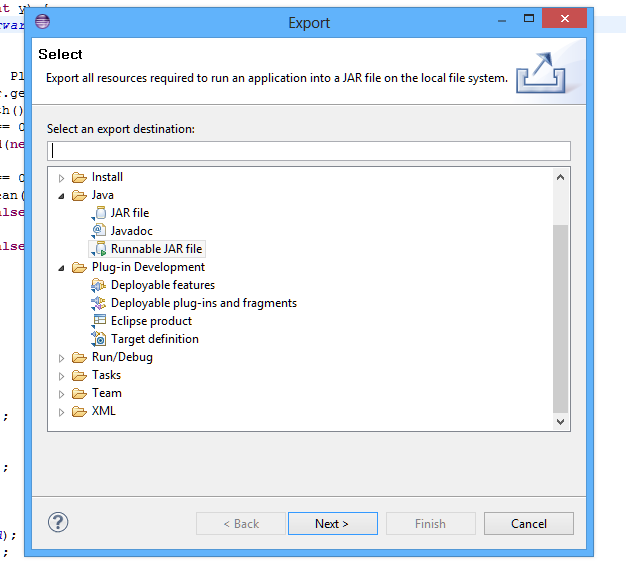
- Click Export
You will be presented with the following screen
Its very important you select Runnable JAR file.
Third step, setup the export options
You need to select the following options:
- Launch configuration: Set to be the “Main” class in your project. This is a drop down box, Eclipse automatically adds class files to this list when you run your project.
- Export Destination: Should be pretty obvious, just set where you want the Jar file to be exported
- Library Handling: MAKE SURE TO SELECT “COPY REQUIRED LIBRARIES INTO A SUB FOLDER NEXT TO THE GENERATED JAR”!. No really, make sure you do.
Edit
Apparently you can choose any of the three options when exporting, I didn’t realize this. Sorry for the misleading information!
That’s it! Hit Finish.
Ha, tricked you! We really aren’t finished, we still need to use the dreaded JarSplice.
Fourth step, make sure you have the following files
Navigate to wherever you set the Jar file to export to, and make sure you have a Jar file and a folder that look something along the lines of this
(I wanted to show off my amazing Snarf Vader background!)
The “project_lib” folder contains all the libraries my project uses.
Fifth step, open JarSplice
I don’t know why this is even a step, but you do actually have to open JarSplice to use… so be sure to do that!
Sixth step, add the libraries Eclipse put into that “project_lib” folder!
On the left side of JarSplice, click the Add Jar tab and then at the bottom click Add Jar(s).
Navigate to the export path and open your “project_lib” folder. Select all the Jar files in that folder and hit Add. Done!
Seventh step, add the natives
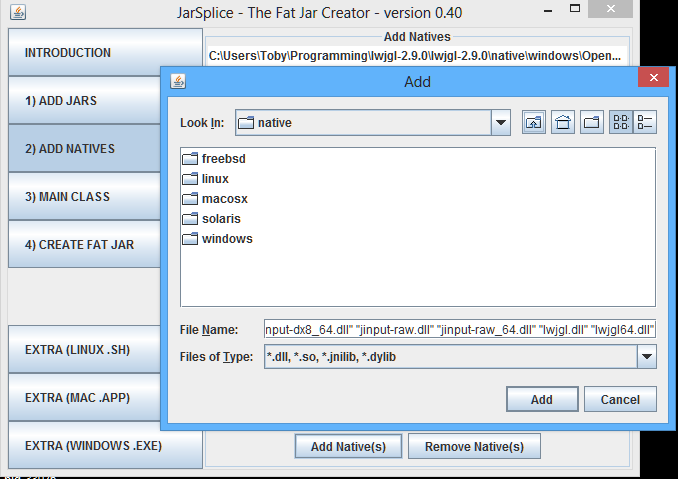
This is the trickiest part because many newbies don’t know what the hell natives are, or where they are stored. It’s pretty simple actually! Generally speaking, most people are using JarSplice to splice their OpenGL driven programs, and they use LWJGL as the wrapper to access it with Java. So, you had to have downloaded LWJGL to use it. Navigate to your LWJGL folder and go into the native folder. You should be presented with the following options:
The amazing thing about JarSplice is that it allows you to create one Jar with all those natives so you only have to maintain and deploy one file. You can, of course, deploy one Jar file per OS to cut down on the size, but native files are tiny. Anyway, add all the natives from these folders into JarSplice. You’re almost done!
Eight step, select the main class
Easy step, just enter in the path to the main class of your project. But be careful! JarSplice doesn’t need to know where you store the file on your computer, it just wants to navigate to the file as if it were you, the coder. What the hell am I talking about? I explained that poorly, so here’s an example:
Say my “main” class is in package “com.mywebsite.mygame.Main”. You would type this into JarSplice!
Last step, generate the Jar!
Click the Create Fat Jar tab and hit Create Fat Jar, then select a place to save it. Hit Save and done!
If you have any questions, feel free to comment! Thanks for reading, I hope I made your life easier!


