LWJGL16k Tips & Tricks

Thought I’d create a thread where we can share various tips, tricks, code snippets to help everyone get started with LWJGL16k.

If you’ve never used the LWJGL API or are a little rusty I’d recommend you visit the LWJGL Wiki and run through the LWJGL Basics Tutorial Series, it’ll go thorough the basic API, how to use the LWJGL high res timer, fullscreen modes, input, etc. The Wiki also has guides on how to set LWJGL up in various IDE’s

A basic example of a LWJGL game loop

import org.lwjgl.LWJGLException;
import org.lwjgl.opengl.Display;
import org.lwjgl.opengl.DisplayMode;

public class SimpleExample {

	public void start() {
		try {
			Display.setDisplayMode(new DisplayMode(800, 600));
			Display.create();
		} catch (LWJGLException e) {
			e.printStackTrace();
			System.exit(0);
		}

		// init OpenGL here

		while (!Display.isCloseRequested()) {

			// render OpenGL here

			Display.update(); // update, will display what you rendered above
			Display.sync(60); // cap to 60fps
		}

		Display.destroy();
	}

	public static void main(String[] argv) {
		SimpleExample example = new SimpleExample();
		example.start();
	}
}

It’s worth mentioning at this point that LWJGL’s sync() method is quick and dirty and won’t give you perfectly smooth results (see that other huge thread about stuttering). But it is entirely adequate for what we’re doing here.

Also: for initing displays I strongly recommend running at desktop resolution and fullscreen. The init code becomes:


Display.setDisplayModeAndFullscreen(Display.getDesktopDisplayMode());
Display.create();

If you fancy being clever, turn on vsync as well.

Cas :slight_smile:

Ah yes, true, its possible to completely rely on Vsync for limiting fps

Display.setVSyncEnabled(true);

However there are some crappy graphics drivers out there on which Vsync for whatever reason just doesn’t work (especially some intel drivers). This will cause your game will run on full fps. A trick is to also include a Display.sync in your game loop but at a slightly higher rate than normal screen refresh rates, like:

Display.sync(90); // cap at 90fps

this way the call will have no effect on machines that Vsync is working on but will be a safe fall back for computers where Vsync is failing.

For those that were curious on how the lwjgl applet stuff works like in the Viper16k entry, its pretty straight forward, especially with LWJGL’s AppletLoader.

A lazy leeching technique is used to make the process even easier. So you don’t have to sign anything, fiddle with any lwjgl natives and jars, or go through the hassle of uploading multiple files.

All you need is a html file with an applet tag like below. This grabs the pre-signed jars directly from the LWJGL site and includes your game jar. Just set the applet tag width/height to the same as the Display size that you create for your application.

<applet code="org.lwjgl.util.applet.AppletLoader" archive="http://lwjgl.org/applet/lwjgl_util_applet.jar, http://lwjgl.org/applet/lzma.jar" codebase="." width="640" height="480">
    <param name="al_title" value="YourGamesName">
    <param name="al_main" value="YourAppletClassName">
    <param name="al_jars" value="yourgame.jar, http://lwjgl.org/applet/lwjgl.jar.pack.lzma, http://lwjgl.org/applet/lwjgl_util.jar.pack.lzma">
    
    <param name="al_windows" value="http://lwjgl.org/applet/windows_natives.jar.lzma">
    <param name="al_linux" value="http://lwjgl.org/applet/linux_natives.jar.lzma">
    <param name="al_mac" value="http://lwjgl.org/applet/macosx_natives.jar.lzma">
  	
    <param name="separate_jvm" value="true">
  </applet>


Remember that your game jar is not signed so its limited to function inside the java sandbox but can access all the LWJGL API’s.

Lastly you don’t have to do anything drastic to change your LWJGL Application to an Applet, nor does the Applet code even have to be part of your game code, just create your LWJGL Application as normal. You can then use a separate Applet Hook class to start the application as an applet, an example of this is below:

import java.applet.Applet;
import java.awt.BorderLayout;
import java.awt.Canvas;
import org.lwjgl.LWJGLException;
import org.lwjgl.opengl.Display;

public class ExampleApplet extends Applet {
	
	Canvas display_parent;
	
	/** Thread which runs the main game loop */
	Thread gameThread;
	
	/** This is your LWJGL16k applications main class */
	YourMainClass yourGame;
	
	public void startLWJGL() {
		gameThread = new Thread() {
			public void run() {
				running = true;
				try {
					Display.setParent(display_parent);
					yourGame = new YourMainClass(); // Your init code which creates Display & runs game loop
				} catch (LWJGLException e) {
					e.printStackTrace();
				}
				gameLoop();
			}
		};
		gameThread.start();
	}
	
	
	/**
	 * Tell game loop to stop running, after which the LWJGL Display will 
	 * be destoryed. The main thread will wait for the Display.destroy().
	 */
	private void stopLWJGL() {
		yourGame.running = false; // tell your main game loop to stop and call Display.destroy();
		try {
			gameThread.join();
		} catch (InterruptedException e) {
			e.printStackTrace();
		}
	}

	public void start() {
		
	}

	public void stop() {
		
	}
	
	/**
	 * Applet Destroy method will remove the canvas, 
	 * before canvas is destroyed it will notify stopLWJGL()
	 * to stop the main game loop and to destroy the Display
	 */
	public void destroy() {
		remove(display_parent);
		super.destroy();
	}
	
	public void init() {
		setLayout(new BorderLayout());
		try {
			display_parent = new Canvas() {
				public final void addNotify() {
					super.addNotify();
					startLWJGL();
				}
				public final void removeNotify() {
					stopLWJGL();
					super.removeNotify();
				}
			};
			display_parent.setSize(getWidth(),getHeight());
			add(display_parent);
			display_parent.setFocusable(true);
			display_parent.requestFocus();
			display_parent.setIgnoreRepaint(true);
			setVisible(true);
		} catch (Exception e) {
			System.err.println(e);
			throw new RuntimeException("Unable to create display");
		}
	}
}

Remember when running as applet your applications main() method isn’t run, you can just move any relevant code to your applications constructor method.

tip: You can only use code allowed in the java sandbox, so no System.exit(0);

For full information the LWJGL Wiki covers the applet stuff in pretty good detail.

Font support seemed like it would be tricky to implement in such a small space, however after discussion on IRC someone pointed out that its pretty easy using a really small texture and without AWT. So here is my attempt.

1) Drawing the font
The smallest power of 2 texture that I thought would fit here is 256x8, so using paint I drew a basic monochrome font. All letters have a size of 5x6 and all other symbols before the letters use a size of 3x6.

The font char’s are kept in the same order as the values of the java char’s so that its easier to map them directly using char values and require minimal code. These values were obtained using:

for (int i = 0; i < 100; i++) System.out.println("I: " + i + " : " + (char)i);

This also allows one to see what range you need and what to put in the bitmap. The font is also kept on a single line to further simplify the code when calculating texture values (so you only need to worry about x value and not y).

After condensing the above by removing excess spaces, I ended up with a 256x8 image:

The font is white so that it can be easily coloured in using opengl.

2) Storage
The PNG is pretty small, however I didn’t want the overhead of storing and decoding the PNG. Since the image only uses black and white pixels, each one can be represented by a single bit, and since its 256x8 in size, it would require just 2KB to store as a bytes, which can then be converted to a String and stored in the code. Zip/LMZA will then do its magic on this highly compressible String when packaging.

3) Implementation
MatthiasM’s PNGDecoder is used to load the image into a ByteBuffer, which is then converted into a BitSet, then into a byte[] and finally into a String to store it in code (had some trouble with the last step, so just used the Base64 encoder).

The Image to String code will output the String that you can store and looks like the following:

import java.io.FileInputStream;
import java.io.IOException;
import java.io.InputStream;
import java.nio.ByteBuffer;
import java.util.BitSet;

import javax.xml.bind.DatatypeConverter;

public class ImageToString {

	private void loadTexture(String file) throws IOException {
		InputStream in = new FileInputStream(file);

		try {
			// use PNGDecoder to load texture into a ByteBuffer
			PNGDecoder decoder = new PNGDecoder(in);
			ByteBuffer byteBuffer = ByteBuffer.allocateDirect(4 * decoder.getWidth() * decoder.getHeight());
			decoder.decodeFlipped(byteBuffer, decoder.getWidth() * 4, PNGDecoder.Format.RGBA);
			byteBuffer.flip();
			
			
			// convert ByteBuffer into BitSet
			BitSet bits = new BitSet(256*7);
			int count = 0;
			for (int i = 0; i < byteBuffer.capacity()-256*4; i += 4) {
				byte b = byteBuffer.get(i);
				if (b == -1) bits.set(count);
				count++;
			}
			
			// convert BitSet into byte[]
			byte[] bytes = new byte[bits.length() / 8 + 1];
		    for (int i = 0; i < bits.length(); i++) {
		        if (bits.get(i)) {
		            bytes[bytes.length - i / 8 - 1] |= 1 << (i % 8);
		        }
		    }
			
		    // convert byte[] into base64 and output
			String s = DatatypeConverter.printBase64Binary(bytes);
			System.out.println(s);
			
		} finally {
			in.close();
		}
	}
	
	public ImageToString() {
		// load texture and output it to base64
		try {
			loadTexture("res/font.png");
		} catch (IOException e) {
			e.printStackTrace();
		}
	}
	
	public static void main(String[] args) {
		new ImageToString();
	}
}

Which gives the following output:

fjGMY//9///+HP/x//7/v/wAB//7+uAAA8gAKgAAAABiP4xiQMUxjGoWkJEIQ5CmMIgFsJsjsAAGaAAqAAAAADIkjGJAxTGMahOQkQhDEKY5dJfz//q4AKwgAAIAAAAAG/+u4k/9P4xqFpCf698Q/+oCBLLJCqxx1CAAAgAAAAAOEauiSDUhjGIclJGIQ5DGIXSUsskKpASuYAAAAAAAAH/x+T5P5+H8Y/if8fh+//4oiIfz+f/hBAPAAAIAAAAAAAAAAAAAAAAAAAAAAAAAAAAAAAAAAAAAAAAAAA==

You can embed the above String and then at runtime you just need to use the Base64 decoder to get the bytes, put the bytes into a BitSet and then create a ByteBuffer out of it which can be loaded as a 256x8 texture.

Once you have the Opengl Texture loaded, its a simple matter of parsing and drawing the text. Do remember to use GL_NEAREST since the font is so small and we don’t want any filtering or blurring. This will give us a nice retro looking resizeable font which can easily be coloured.

I’m pretty sure there is room for improvement and hopefully someone will point out how it can be improved (likely with the byte[] to String step).

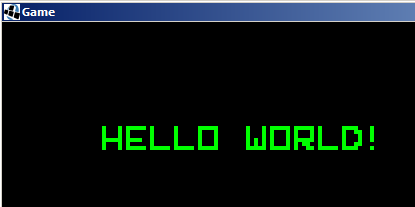
Lastly here is the full FontTest code, which should display the text “Hello World!”, hopefully someone will find it useful.

import java.nio.ByteBuffer;
import java.util.BitSet;

import javax.xml.bind.DatatypeConverter;

import org.lwjgl.BufferUtils;
import org.lwjgl.LWJGLException;
import org.lwjgl.opengl.Display;
import org.lwjgl.opengl.DisplayMode;

import static org.lwjgl.opengl.GL11.*;

public class FontTest {

	String textureData = "fjGMY//9///+HP/x//7/v/wAB//7+uAAA8gAKgAAAABiP4xiQMUxjGoWkJEIQ5CmMIgFsJsjsAAGaAAqAAAAADIkjGJAxTGMahOQkQhDEKY5dJfz//q4AKwgAAIAAAAAG/+u4k/9P4xqFpCf698Q/+oCBLLJCqxx1CAAAgAAAAAOEauiSDUhjGIclJGIQ5DGIXSUsskKpASuYAAAAAAAAH/x+T5P5+H8Y/if8fh+//4oiIfz+f/hBAPAAAIAAAAAAAAAAAAAAAAAAAAAAAAAAAAAAAAAAAAAAAAAAA==";
	int textureID;
	
	public void start() {
		try {
			Display.setDisplayMode(new DisplayMode(800, 600));
			Display.create();
		} catch (LWJGLException e) {
			e.printStackTrace();
			System.exit(0);
		}
		
		// init OpenGL here
		glViewport(0, 0, 800, 600);
		glMatrixMode(GL_PROJECTION);
		glLoadIdentity();
		glOrtho(0, 800, 600, 0, 1, -1);
		glMatrixMode(GL_MODELVIEW);
		glLoadIdentity();

		glEnable(GL_TEXTURE_2D);
		
		// enable blending so the black parts of font are transparent
		glEnable(GL_BLEND);
		glBlendFunc(GL_SRC_ALPHA, GL_ONE_MINUS_SRC_ALPHA);
		
		// load out string into a texture
		textureID = loadTexture();

		while (!Display.isCloseRequested()) {
			glClear(GL_COLOR_BUFFER_BIT);
			
			glColor3f(0, 1f, 0); // set green font color
			drawString("HELLO WORLD!", 100, 100, 4);
			
			Display.update(); // update, will display what you rendered above
			Display.sync(60); // cap to 60fps
		}

		Display.destroy();
	}
	
	public void drawString(String text, float x, float y, float fontSize) {
		glBindTexture(GL_TEXTURE_2D, textureID); // bind our texture
		
		float offset = 0;
		
		for (int i = 0; i < text.length(); i++) {
			
			int c = text.charAt(i) - 33;
			
			// if not within supported char range skip and add space
			if (c < 0 || c > 57) {
				offset += 5 * fontSize + fontSize;
				continue;
			}
			
			int w = 3;
			int subtract = 0;
			
			if (c > 31) {
				w = 5;
				subtract = 31 * 2 + w;
			}
			
			float width = w * fontSize;
			float height = 8 * fontSize;
			
			float texStart = 1f/256*(w*c-subtract);
			float texEnd = texStart + 1f/256*w;
			
			glBegin(GL_QUADS);
	
				glTexCoord2f(texStart, 1);
				glVertex3f(x + offset, y, 0);
		
				glTexCoord2f(texEnd, 1);
				glVertex3f(x + width + offset, y, 0);
		
				glTexCoord2f(texEnd, 0);
				glVertex3f(x + width + offset, y + height, 0);
		
				glTexCoord2f(texStart, 0);
				glVertex3f(x + offset, y + height, 0);
	
			glEnd();
			
			offset += w * fontSize + fontSize;
		}
	}
	
	private int loadTexture() {
		
			// convert base64 string to byte[]
			byte[] bytes = DatatypeConverter.parseBase64Binary(textureData);
			
			BitSet bits = new BitSet();
		    
			// convert byte[] to BitSet
			for (int i = 0; i < bytes.length * 8; i++) {
		        if ((bytes[bytes.length - i / 8 - 1]&(1 << (i % 8))) != 0) {
		            bits.set(i);
		        }
		    }
			
			ByteBuffer textureData = BufferUtils.createByteBuffer(4 * 256 * 8);
			
			// fill texture from bits
			for (int i = 0; i < 256*8; i++) {
				for (int j = 0; j < 4; j++) { // 4 bytes (needed for each component of RGB)
					if (bits.get(i)) textureData.put((byte)-1);
					else textureData.put((byte)0);
				}
			}
			
			textureData.flip();

			int textureID = glGenTextures(); // generate new texture id
			glBindTexture(GL_TEXTURE_2D, textureID); // bind our texture

			// make sure you use gl_nearest as we don't want the texture stretching or blurred
			glTexParameteri(GL_TEXTURE_2D, GL_TEXTURE_MIN_FILTER, GL_NEAREST);
			glTexParameteri(GL_TEXTURE_2D, GL_TEXTURE_MAG_FILTER, GL_NEAREST);
			
			glTexImage2D(GL_TEXTURE_2D, 0, GL_RGBA, 256, 8, 0, GL_RGBA, GL_UNSIGNED_BYTE, textureData);
			
			return textureID;
	}

	public static void main(String[] argv) {
		FontTest fontTest = new FontTest();
		fontTest.start();
	}
}

And the output/result should look like:

I used the same general idea, but put all my data in a file (Music, Fonts, 3D Models, Animation Data) as there was so much of it, the expense of the extra file seemed worth it. The data generation also checks which characters are used in the game and misses out unused ones. The loader looks like:


            // Load Font data
            long font = is.readLong(); // 64 bits indicating which chars
            for (int c=0; c<64;c++) {  // are defined
                fontData[0][c] = BufferUtils.createByteBuffer(44);
                for (int i=0; i<44; i++)
                    if ((font & 1) == 1)          // Define char
                        fontData[0][c].put(is.readByte());
                    else
                        fontData[0][c].put((byte)0); // Space if no definition
                fontData[0][c].rewind();
                font>>=1;
            }

I used bitmaps, rather than textures for all my overlay data. I don’t really have a strong feeling either way. Here is my string drawing code:


    /** Print text string at x, y at specified size */
    public void print(int x, int y, int size, String s) {
        for (int i=0; i<s.length(); i++) {
            char c = s.charAt(i);
            if (c>='.' && c<='9') c -='.';
            else if (c>='A' && c<='Z') c -='A'-12;
            else if (c>='a' && c<='z') c -='a'-38;
            else continue;
            GL11.glRasterPos2i(x+size*16*i, y);            
            GL11.glBitmap(16*size, 22*size,
                0f, 0f, 0f, 0f, fontData[size-1][(int)c]);
        }
    }

If there is any interest I will paste in some of the data data file generation code

Regards, Alan

Oh, btw 16 x 22 monochrome character set => 44 bytes of data per character.
Character set is ‘./’ , ‘0-9’, ‘A-Z’ & ‘a-z’. The ‘/’ is actually defined to be the copyright symbol in my implementation.

Some snippits from the character set generation code


    /** Include font support for all characters in this string */
    public void includeFont(String s) {
        for (int i=0; i< s.length(); i++) {
            char c = s.charAt(i);
            if (c>='.' && c<='9') c -='.';
            else if (c>='A' && c<='Z') c -='A'-12;
            else if (c>='a' && c<='z') c -='a'-38;
            else continue;
            font[(int)c] = true;
        }
    }
    /** Add 64 character, 16x22 font to the data file */
    public void convertFont(String filename) {
        try {
            // Get the font graphics file
            System.out.println(" "+filename);
            is = new FileInputStream(filename);
            BufferedImage img = ImageIO.read(is);
            // Construct 64 bit header
            // Bit 0 is set if char 0 is present in file etc.
            long f = 0;
            for (int i=63; i>=0; i--)
                if (font[i])
                    f=(f<<1) | 1;
                else
                    f<<=1;
            // Write header as a 'long'
            for (int i=7; i>=0; i--)
                os.write( (int)((f>>(i*8)) & 0xff) );
            for (int c=0; c<64; c++)
                if (font[c])
                    for (int y=0; y<22; y++)
                        for (int x=0; x<2; x++) {
                            int bits = 0;
                            for (int b=0; b<8; b++) {
                                int colour =
                                    img.getRGB(16*c+8*x+b, 21-y) & 0xffffff;
                                int mask = (colour==0)?1:0;
                                bits = bits*2 + mask;
                            }
                            os.write(bits);
                        }
            is.close();
        } catch (Exception e) {e.printStackTrace(); };
        
    }

@Alan_W oh that is pretty cool, nice to see another take on the problem, thx for posting.

@kappa

Thanks for the kind words. Textures have the advantage of being more easily scaled and there is less chance of pipeline inefficiency due to mixing 2D & 3D primitives. (Edit: Also sending bitmap data every frame!) On the other hand changing font colour is really easy with bitmaps.

I was wondering about trying a 16 segment LED display approach as a space saving alternative. Each character code looks up a 16 bit value which controls the segments


 [u] [/u] [u] [/u] 
|[u]\[/u]|[u]/[/u]|
|[u]/[/u]|[u]\[/u]|

Note there is no ‘.’ which may therefore have to be a special case. The segments can be drawn as a 16 colour bitmap, so 16*16 (say) would require 32 x 4 = 128 bytes. Unfortunately a separate mask would be required to remove areas that aren’t part of the display. A 15 segment display would therefore be a better bet, if I can find two segments that are always illuminated together. A quick look wasn’t that promising, so this idea needs more work.
The following comes from a MAXIM MAX6954 display:

http://www.maxim-ic.com/images/appnotes/3212/3212Fig03.gif

Seems to work pretty well. No lower case though. I’m probably going with this :slight_smile:

http://homepage.ntlworld.com/alan.d.waddington/java/competitions/lwjgl16k/2011/16segment_a_z_alt.png

Alan

Very nice idea with the LED Display.

-> But I would alter the “B” by rendering it like an “8”, but with the top “Bow” only going half-wide to the middle
Looks better than the proposed layout.

Well spotted. I mucked it up first time round and didn’t implement it correctly against the segment table (see earlier post).
That’s now fixed. Your alternative also looks pretty good. :slight_smile: