Launch4J

I’m trying to turn a jar into an exe using launch4j but I’m useless with these tools.
I have the program running in a small window however I normally make the program run full screen with the following:

[quote]>java -jar -Dsun.java2d.noddraw=true AlienSwarm.jar FULLSCREEN
[/quote]
How do I do this with launch4j?

How can I test that the program will run fine on a PC with no java (or an old java) installed?

Many thanks

Mike

So let me get this straight, you want to run a java program without java installed? You know that Launch4J just creates an executable version of the Jar file so that your program is easier to distribute. I don’t understand why you think you can run a Java program without a JRE installed, unless I’m missing something here.

Have you tried looking at the docs? Both the “” tag section as well as the “Additional JVM options at runtime” section would seem to be what you’re looking for.

Edit: Forgot to mention the “” section which should be what you need to pass the “FULLSCREEN” flag.

Uninstall Java or get a machine with no Java on it and see what happens when you run the .exe. The “” section of the docs page talks about the different options you have which include: use a bundled JRE that you include with your application, search for an installed system JRE that meets a min/max version requirement, or throw an error and display the Java download page in the user’s browser. I’d make it easy on your end users, and go with the first option.

If you don’t have a second machine, you can always try something like VirtualBox. Create a new virtual drive and do a fresh OS install without Java, then fire up your installer from inside the image. The run time performance will be reduced, but it should allow you to see how the installer will react to different scenarios without messing with your actual OS.

you could also give JarSplice a try, should be a lot more user friendly to use and you can easily include vm parameters.

[quote=“opiop65,post:2,topic:45183”]
I believe you’re missing something :smiley: I’m just trying to supply an arcade game in the same vein as the old shot-them-up arcade games. Less technical users on PC don’t like having Java on their PC and prefer to just run a simple exe. Those installing the game into arcade cabinets have probably never heard of Java and they’d never want to see a popup telling them it’s time to update the Java runtime etc. There’s also the current security scares. I know the “dream” was that you could simply trust Java programs and simply run them but the reality (for me) appears very different to end users and they seem to prefer an exe.

Didn’t see docs though I did try what I thought might be the help but it just told me the version of the program. Actually I’ve looked through the docs and I suspect I’m too stupid to understand them :’(

Thanks for the immediate responses by the way.

It looks like their graphical front end should make the options easy to set.

If that doesn’t work, try editing the project’s XML file directly.

To answer your question about command line parameters, yes. Look at the 6th text input box down on the above screenshot of launch4j.

I hate coming back to this simply because it makes me feel like a fool >:(
I simply want my exe to run whether the user has Java, an old Java or no Java at all.
I assume I need to bundle the Java inside the exe.
There’s a field on the JRE tab called “Bundled JRE path” but what do I enter?
Do I need to zip anything or place anything inside my jar or directory?
Do I need to specify a minimum version or anything?

Mike

PS I’ve been through the docs

I’m afraid I don’t use NetBeans etc.
If I went down that path then I’d just be back again with a new bunch of questions.
At least on this path I’m only stuck on one (hopefully small) thing.

There’s no foolishness in asking for assistance in figuring something out. 8)

I think this is where some of the confusion is coming from. Let’s break this down into two steps.

The first step is getting the JRE onto the users computer. For this, you’ll need to download a tool suck as NSIS or Inno Setup. Both of these packages are free and allow you to create Windows installers; Inno Setup is the tool that NetBeans, as mentioned by Tom, uses to create its installers. This will allow you to bundle up your executable and supporting files created by Launch4J along with a standalone JRE and any other related files into one executable that your users will download and run in order to get all the needed components onto their PC.

Now that we have the solution for how to reliably get a JRE onto the end user’s computer, we can concentrate on the second step, the settings in Launch4J. At some point while creating the installer that I just mentioned, you’ll have to decide on a directory structure for your application.

Let’s assume it looks like this:


<MyApplication>
    |____<JRE>
    |____<bin>
    |   |____MyLaunch4J.exe
    |____<etc>

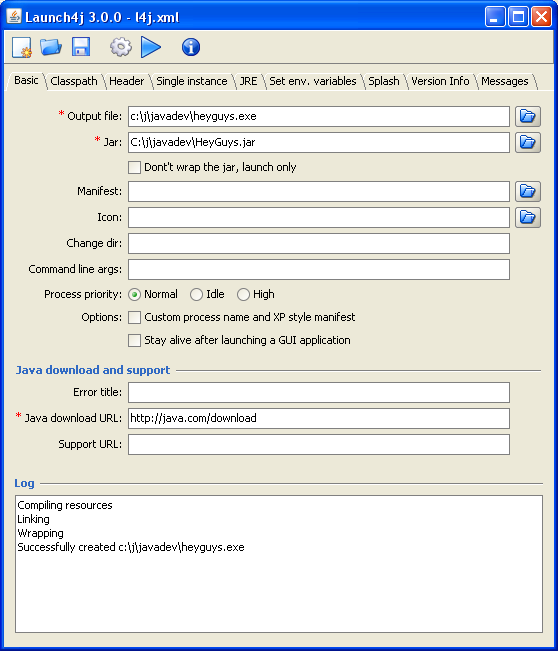
You will need to enter in a relative path to the JRE directory in Launch4J’s “Bundled JRE Path” field. Using our example structure above, the path would be (without the quotes) “…\JRE” since the JRE folder is one level up from where the executable file resides. If the executable was directly in the “MyApplication” folder then the path would be “.\JRE”. Hopefully this gets you closer to getting everything packaged up for distribution. If you have any other questions, feel free to ask.

Quick last note. Obtaining a “standalone JRE” is as easy as copying your JRE folder from your “Program Files” to your applications directory structure. This means that the JRE you’ve used during development will be the same one your end users receive. One less compatibility issue to worry about.

Thanks for replying so soon!

[quote=“CodeHead,post:9,topic:45183”]
No, but if someone just can’t understand the answers then I’d start to have my suspicions :wink:

I thought the idea was to bundle the java.exe along with your jar so it didn’t need to install java? I don’t know for certain but I’m pretty sure my target audience don’t want Java on their PC’s as the PC’s -their PC’s are running inside gaming cabinets with perhaps a few arcade controls for input - having a java popup telling them to get the latest security update would just destroy the whole illusion of having a dedicated arcade cabinet. I just want an exe the user can run.

[quote=“mike_bike_kite,post:10,topic:45183”]
You have the right thought. The JRE that’s distributed with your application isn’t technically “installed” by the Windows’ definition of installed. It doesn’t modify the registry, it doesn’t attempt to hook into the browser, it doesn’t modify JAVA_HOME, and it doesn’t install the Java update scheduler. Java is a lot more independent of the OS than most people think. That being said, your users will not be notified of Java updates or prompted to download anything when using the previously mentioned technique, at least not by the JRE you distribute with your application. It’s just as seamless as any native application to the end user.

We actually use standalone JRE installations where I work when we have an application to deploy that requires a newer version of the JRE than what the user has on their system, but updating the system installed JRE isn’t feasible due to IT department restrictions. PrinceC also uses standalone JREs for Puppy Games releases if I recall correctly.

It’s taken me about a month to realise that I can’t get launch4J to work.
I’m guessing it will take me another month of perpetual trial, error and failure to play with NSIS and Inno.
It’s a bit depressing :’(
It’s a shame that launch4J can’t just do this - I thought the whole point of the tool was to produce an executable exe.

Well, deployment is as much a part of development as any other step in the process and if you want other people to use your creations, then you’ll have to add it to your stack of knowledge at some point.

Launch4J does exactly as advertised; it creates an executable wrapper for your jar file. While it offers some options to make it easier to find or install a JRE on an end users computer, it’s not the main focus. Even if it was, you don’t want to bind Java to the OS by using an Oracle/OpenJDK installer, especially in the case of a stand alone game cabinet as you describe.

Let me ask you this, how big of a project are you dealing with here? Does it require anything beyond essentially sticking your game in a folder on the computer, or do you want the full “proper” Windows installation flow including entries in Add/Remove programs? If it’s the first case, then you can probably get away with skipping over NSIS like tools and use something as simple as WinZip to create a self extracting archive for distribution.

If you can show me how you want your final directory structure to look, I can try creating a Launch4J project that will work with your structure, then I’ll send the configuration file back to you along with a Zip file that includes the directory structure along with a standalone JRE already in place. You’d still have to build the final executable yourself (unless you want to actually send the files in which case you’d get back a finished package) but you should be able to see how everything relates in L4J.

That’s well above the normal call of duty but I’m certainly not going to stop you :slight_smile:

I don’t need an installer, just an exe is fine.
I’ll release it with a few batch files that call the exe with different parameters depending on whether they’re installing the program in a cabinet or just via PC.
I just have a single directory and everything is stuffed into it at present. Does that count as a directory structure?
I know it’s not a pretty way of doing things but everything was hidden in the jar so I didn’t spend the time to set up the directories.

Mike

My current xml file looks like this if that helps:

<launch4jConfig>
  <dontWrapJar>false</dontWrapJar>
  <headerType>gui</headerType>
  <jar>E:\Dropbox\Projects\AlienSwarm\AlienSwarm.jar</jar>
  <outfile>E:\Dropbox\Projects\AlienSwarm\AlienSwarm.exe</outfile>
  <errTitle></errTitle>
  <cmdLine>-Dsun.java2d.noddraw=true</cmdLine>
  <chdir>.</chdir>
  <priority>high</priority>
  <downloadUrl>http://java.com/download</downloadUrl>
  <supportUrl></supportUrl>
  <stayAlive>false</stayAlive>
  <manifest></manifest>
  <icon>E:\Dropbox\Projects\AlienSwarm\AlienSwarm.ico</icon>
  <jre>
    <path>./jre7/bin/</path>
    <bundledJre64Bit>false</bundledJre64Bit>
    <minVersion></minVersion>
    <maxVersion></maxVersion>
    <jdkPreference>preferJre</jdkPreference>
  </jre>
</launch4jConfig>

Well, I hate to see someone get all the way through the process of development only to be stymied by the deployment phase. Give me a little while to get everything together (I’m currently going back and forth from my PC to other parts of the office atm), and we’ll see if we can’t get you back on track in short order. :slight_smile:

Alright, I think we have you set. ;D Here is a link to a self extracting zip version of your game, and here is a link to a regular zip version of your game. The self extractor was created with 7zip. While this was a pretty straightforward build, you’ll have to give me a little time to get a summary of the steps posted since I’m about to head out to lunch; I just didn’t want to leave you hanging when it came to the final product.

These were built with the latest version of the game from your web page and includes a bundled Java7 JRE. I also took the liberty of editing your batch files to work with the .exe version of your game. Give it a try out an let me know if anything is off. I’ve tested it here a few times with no issues, but one machine is hardly definitive proof.

I’ll include the configuration file that was generated by Launch4J for your reference. I tried to keep the directory structure as close as possible to what it looked like you had.


<launch4jConfig>
  <dontWrapJar>false</dontWrapJar>
  <headerType>gui</headerType>
  <jar>E:\Dropbox\Projects\AlienSwarm\AlienSwarm.jar</jar>
  <outfile>E:\Dropbox\Projects\AlienSwarm\AlienSwarm.exe</outfile>
  <errTitle></errTitle>
  <cmdLine></cmdLine>
  <chdir></chdir>
  <priority>normal</priority>
  <downloadUrl>http://java.com/download</downloadUrl>
  <supportUrl></supportUrl>
  <stayAlive>false</stayAlive>
  <manifest></manifest>
  <icon>E:\Dropbox\Projects\AlienSwarm\AlienSwarm.ico</icon>
  <jre>
    <path>.\jre7</path>
    <bundledJre64Bit>false</bundledJre64Bit>
    <minVersion></minVersion>
    <maxVersion></maxVersion>
    <jdkPreference>preferJre</jdkPreference>
    <opt>-Dsun.java2d.noddraw=true</opt>
  </jre>
</launch4jConfig>

I’ll be back in a while to post the steps I went trough so you can reference them in the future. 8)

Oh bugger - I haven’t released the latest version of the game for a month or two.
Shall I PM the jar or wait for the instructions?
Mike

PS I PM’ed the jar anyway

Not a biggie. It will probably be a little while longer before I get a chance to post the instructions, so feel free to send an updated version of the .jar (I didn’t see it in my messages here, so it may not have gone through yet). You can always email it to me redacted if that makes it easier. Once I get it, I should be able to get it back to you within a few minutes (uploading to my host takes the most time). :wink:

Er, maybe edit out your email address from the previous post ^^^ and PM it instead?

Ah, thanks to a cancelled meeting, it looks like I have more time than I thought. 8)

How to create an executable application from a runnable jar file with Launch4J

  • Create a project folder for your files. I recommend making two sub-folders, the first called Input will hold all of the needed files for your Launch4J project, namely your main .jar file, your Launch4J configuration file, and your applications .ico file (if desired). Call the second folder Output; this will hold the directory structure for our final distribution.

  • Copy your .jar file and optionally your .ico file into the Input folder. You should also go ahead and copy any files needed by your application into the Output folder at this point. This will include any external lib folder/.jar files that your application uses, any native files that your application uses, and your standalone JRE directory.

  • Fire up Launch4J and fill in the following fields on the “Basic” tab:
    [list][li]Output file: This should be set to \Output<Your .exe file name>

  • Jar: This should be set to \Input<Your .jar file name>

  • Icon: Optional, this should be set to \Input<Your .ico file name>
    [/li]

  • Now switch to the “JRE” tab and fill in the following:
    [li]Bundled JRE path: This is the relative path of your jre to the .exe file that Launch4J produces. Since your application has the .exe file and the jre folder in the same directory, it should look like .<JRE folder name>- JVM Options: Any flags that you would usually pass to the JVM go here (for example: -Dsun.java2d.noddraw=true)
    [/li]

  • At this point you’re ready to click on the build wrapper button in Launch4J (It’s in the top toolbar and looks like a gear). You will be prompted to save your configuration file at this point if you havent already. I advise saving it as \Input<Your project name .xml> in case you need to make changes in the future. Once the file is saved, Launch4J should spit out your .exe file in the directory yu specified earlier.

  • All that’s left is to make a folder named after your application (ie: AlienSwarm), copy all of the files from the \Output folder to the new folder, then try out the executable. If all went well, your application should b up and running. If you want to make sure that it’s using the JRE in the current folder, you can try renaming the JRE folder and firing up the application again. In this instance we’re hoping to see an error message appear. Now that you’re satisfied it’s using the correct JRE folder, rename it to the previous name, open the application again to verify the error dialog no longer appears, and you’re done.

  • Bonus Step: Download a copy of 7-Zip (it’s free) and install it. Now right click on your applications distribution folder and choose 7-Zip>Add to archive. On the “Add to Archive” window that appears, set the “Archive format” option to “7z”, check the option on he right that says “Create SFX archive”, then click the ok button. After a few moments 7-Zip will complete, and you will have a self extracting archive that’s ready to distribute to Windows users. If you just want a plain .zip archive, do the same steps except set the “Archive format” option to “zip” and leave the “Create SFX archive” option unchecked (it should be grayed out once you change the archive format anyway).
    [/list]

Give the instructions a shot and let me know if you have any issues. My “how to” writing skills tend to range from “craptastic” all the way up to “not so good”, so if you have any questions, I will be more than happy to clarify.